
Each day there is a new “life hack” video on social media. People are loving this idea of cheap and easy ways to get the same result. I have seen a great deal of “hacks” regarding photography. I myself have done photography for many years and was curious about the legitimacy of these tips. Of course, I had to put them to the test.
I have a Canon t5i Rebel camera. This week, I put each of these hacks to the test both on manual mode and automatic mode.
I’ll show you what my camera looked like with the “gear” and the results from the shot.
——————————————————————————————————————————-
Hack #1: Get a sandwich bag and cut the bottom off. Wrap the bag around your lens with a rubber band or hair tie and shoot on either manual or automatic mode. It will create a haze glow around your subject.
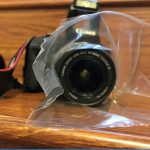
I was actually very surprised at how much I liked this tip. Sure, you had to readjust the bag several times around the frame of your subject. I liked it with and without the flash on manual and the automatic mode. I give this one a thumbs up!

——————————————————————————————————————————-
Hack #2: Finish up your can of chips and cut the bottom off. The shiny interior creates a perfect place to bounce light. It will create perfect studio look, even if you’re just in your living room.
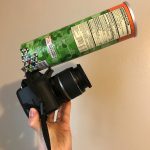
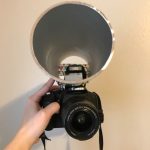
I doubted this one the most out of all of them. However, I was pleasantly surprised again and how much of a difference it made. The light was targeted directly around my face giving the spot light effect. My next attempt is going to be in a darker room.
Note: When I think of studio shot, I think of indoors. I don’t know what kind of effect this might have outside at night. Try it yourselves and let us know what you think!


original result
——————————————————————————————————————————-
Hack #3: Grab a pair of old tights and gently stretch them across your lens. Wrap it with a rubber band to keep it in place. The tights will help soften the light in your shot. Tip! Use different colors of tights to get some fun images!
Don’t count me in for using this one again. The tights made it very hard to focus on the subject on either manual or automatic mode. It just looked like you had something covering your lens as a mistake. It may possibly be better with something significantly thinner like panty hose. The tights did not do well.


original result
——————————————————————————————————————————-
Hack #4: Sometimes the flash on a camera can be annoying to the subject’s eyes or showing up in the wrong place in the image. To fix that, take a business card and cut two little slits on the bottom short side. Netsle that onto your hot shoe or the flash popper while its up. Now that light will be redirected upwards!
Honestly, I am not 100% sure how I feel about this. With a few more tests, I might find a good opportunity to use it. I wanted to demonstrate this trick on inanimate objects to show you where the reflections and light ended up. It certainly did its job redirecting the light. However, I think with how much it redirected, you might as well just not use the flash.


original result
——————————————————————————————————————————-
Hack #5: If you are playing around and are looking for something fun. Try adding some self-made vignettes to your image. Take black card stock paper and create a lens cover. Cut a shape out of the center of you newly made lens cover. Hold it up and snap away!
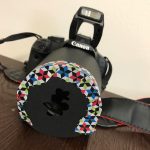
This was kind of a fun variation on framing and adding that vignette. In many of the examples, they recommended you tape your newly created lens cover to the body of your camera. Personally, I liked being able to move it back and forth to better my image. The only thing I didn’t love about this trick is how much black is in the image. I think I would cut a bigger shape next time.

——————————————————————————————————————————-
Overall, I was very impressed with these tricks and hacks! These are great ideas to add a little something extra to your images. Try them out and let us know how they worked for you!